Use of screw gauge to
Wire, metallic sheet, irregular lamina, millimetre graph paper, pencil and screw gauge.
With Vernier Callipers. you are usually able to measure length accurately up to 0.1 mm. More accurate measurement of length, up to 0.01 mm or 0.005 mm, may be made by using a screw gauge. As such a Screw Gauge is an instrument of higher precision than a Vernier Callipers. You might have observed an ordinary screw [Fig E2.1 (a)]. There are threads on a screw. The separation between any two consecutive threads is the same. The screw can be moved backward or forward in its nut by rotating it anticlockwise or clockwise [Fig E2.1(b)]

The distance advanced by the screw when it makes its one complete rotation is the separation between two consecutive threads. This distance is called the Pitch of the screw. Fig. E 2.1(a) shows the pitch (p) of the screw. It is usually 1 mm or 0.5 mm. Fig. E 2.2 shows a screw gauge. It has a screw 'S' which advances forward or backward as one rotates the head C through rachet R. There is a linear scale 'LS' attached to limb D of the U frame. The smallest division on the linear scale is 1 mm (in one type of screw gauge). There is a circular scale CS on the head, which can be rotated. There are 100 divisions on the circular scale. When the end B of the screw touches the surface A of the stud ST, the zero marks on the main scale and the circular scale should coincide with each other.

Zero Error
When the end of the screw and the surface of the stud are in contact with each other, the linear scale and the circular scale reading should be zero. In case this is not so, the screw gauge is said to have an error called zero error. Fig. E 2.3 shows an enlarged view of a screw gauge with its faces A and B in contact. Here, the zero mark of the LS and the CS are coinciding with each other.

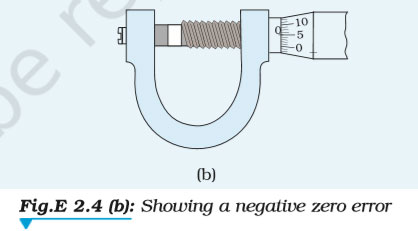
When the reading on the circular scale across the linear scale is more than zero (or positive), the instrument has Positive zero error as shown in Fig. E 2.4 (a). When the reading of the circular scale across the linear scale is less than zero (or negative), the instrument is said to have negative zero error as shown in Fig. E 2.4 (b).


Taking The Linear Scale Reading
The mark on the linear scale which lies close to the left edge of the circular scale is the linear scale reading. For example, the linear scale reading as shown in Fig. E 2.5, is 0.5 cm.

Taking Circular Scale Reading
The division of circular scale which coincides with the main scale line is the reading of circular scale. For example, in the Fig. E 2.5, the circular scale reading is 2.
Total Reading
Total reading
=linear scale reading + circular scale reading x least count
= 0.5 + 2 x 0.001
= 0.502 cm
The linear distance moved by the screw is directly proportional to the rotation given to it. The linear distance moved by the screw when it is rotated by one division of the circular scale, is the least distance that can be measured accurately by the instrument. It is called the least count of the instrument.
pitch Least = count/No. of divisions on circular scale
For example for a screw gauge with a pitch of 1mm and 100 divisions on the circular scale. The least count is
1 mm/100 = 0.01 mm
This is the smallest length one can measure with this screw gauge. In another type of screw gauge, pitch is 0.5 mm and there are 50 divisions on the circular scale. The least count of this screw gauge is 0.5 mm/50 = 0.01 mm. Note that here two rotations of the circular scale make the screw to advance through a distance of 1 mm. Some screw gauge have a least count of 0.001 mm (i.e. 10-6 m) and therefore are called micrometer screw.
(a) Measurement of Diameter of a Given Wire
The linear distance moved by the screw is directly proportional to the rotation given to it. The linear distance moved by the screw when it is rotated by one division of the circular scale, is the least distance that can be measured accurately by the instrument. It is called the least count of the instrument.

The length of the smallest division on the linear scale = ... mm
Distance moved by the screw when it is rotated through x complete rotations, y = ... mm
Pitch of the screw = Y/X = ... mm
Number of divisions on the circular scale n = ...
Least Count (L.C.) of screw guage
= pitch/No. of divisions on the circular scale = ... mm
Zero error with sign (No. of div. x L. C.) = ... mm
Table E 2.1: Measurement of the diameter of the wire
| S. No. | Reading along one direction (d1) | Reading along perpendicular direction (d2) | Measured diameter d = d1 + d2/2 |
| 0 | |||
| Linear scale reading M (mm)/Circular scale reading (n)/Diameter d1 = M + n x L.C. (mm) | |||
| Linear scale reading M (mm)/Circular scale reading (n)/Diameter d2 = M + n x L.C. (mm) | |||
Mean diameter = ... mm
Mean corrected value of diameter
= measured diameter - (zero error with sign) = ... mm
The diameter of the given wire as measured by screw gauge is ... m.


Get all latest content delivered to your email a few times a month.
Resources: